Sunday, June 9, 2019

JavaScript Use Api

AEM offers two API one is Java-Use Api and other is Javascript-Use-Api for the sightly to consume the values. Javascript-Use Api allows developers to write server side code in the front end. The code written in the javascript gets converted into the Java and uses the already available Java libraries. In the backend AEM uses an open source implementation of Javascript known as RHINO which converts the code written in javascript into Java.

I have recently used this API for rendering many components values instead of traditional Sling Models and WCMUsePojo class.

Lets start with a simple example of rendering the properties of a component:

1) For any individual component create a javascript file (example comp.js) parallel to the Html file.
2) Now suppose the component has below fields :
             
                         a) Textfield --> We will name it as title
                         b) Pathfield --> We will name its as path.
                         c) Multifield --> We will name it as primaryLinks.

3) Add the below code in the javascript file created as a part of component earlier :

use(function () {
    return {
  title: properties.get("title"),
   path: properties.get("path"),
primaryLinks: resource.getResourceResolver().getResource(currentNode.getPath() +"/primaryLinks")
}
});

4) Now in order to get the values add the below code in html

<sly data-sly-use.comp="comp.js">

${comp.title}
${comp.path}

<ul data-sly-list.compNav="${comp.primaryLinks}">
<li>${compNav.propertyValue}
</ul>

</sly>

As we can see there are already predefined objects available to be used. Following are the objects available which were there when we had global.jsp into the picture.

a) currentNode
b) currentPage
c) resource
d) log
e) sling
f) pageProperties
g) properties
h) pageManager
i) component
j) designer
k) currentDesign
l) currentStyle

Sometime we need some of the Java Packages available , in order to do the same in javascript use the following code:

var resourceResolver = resource.getResourceResolver().getResource("pathof Node");
 var Node= resourceResolver.adaptTo(Packages.javax.jcr.Node);

One of the use case where I have used the javascript use api was getting the tag name and title from the Tag Path I was getting from the backend. This is also one of the issue I saw in sightly is the iteration of Map of Objects.

Example : If you have Map<Object,Map<Object...>  , the iteration of this object doesn't work in sightly so in order to get tag name and title I passed the tag path in the map and got the name and title of the tag using the javascript api.

So in order to implement the above example we need to pass the tag path from the html to javascript.

In html

<sly data-sly-use.params="${'comp.js' @value=value}"></sly>

Here value will tagPath that will be coming from the backend. The you can pass it in the sly data-sly-list for all the paths while Iterating.

Now in the js use the code as below to get the tag name and tag title

use(function () {
    // you can reference the parameters via the this keyword.
    var resourceResolver = resource.getResourceResolver();
  var tagManager = resourceResolver.adaptTo(Packages.com.day.cq.tagging.TagManager);
    var tag = tagManager.resolve(this.value1);
    var name = tag.name;
    var title = tag.title;

    return {
        title: title,
        name:name
    };
});

The javascript use api is somewhat different than the usual Sling Models and WCMUsePojo , but it sometimes comes handy in some typical cases.


For more information , there is an official documentation for RHINO framework available.

Friday, May 17, 2019

AEM-LDAP Integration

LDAP (Light Weight Directory Access Protocol) is used for accessing centralized repository. In some projects clients maintain a separate LDAP server and prefer to maintain their users at their side.

LDAP is ofter used to achieve Single Sign On which allows users to maintain multiple applications after logging in once.


In this article we are going to use below servers:


1) Apache DS 2.0.0 (LDAP Server)
2) AEM 6.4.0

First lets start with setting up our LDAP server.

Setting Up the LDAP Server


1) Go to the url http://directory.apache.org and download the Apache Directory Studio 2.0.0-M 14.
2) Install Directory Studio.
3) Right click on the LDAP Servers and click New --> New Server 


4) Click on Apache DS 2.0.0 that comes in the pop up window.
5) Then Right Click on the server and click on run.
6) Confirm on the port number for LDAP Server (Default 10309) and LDAP SSL (Default 10306).
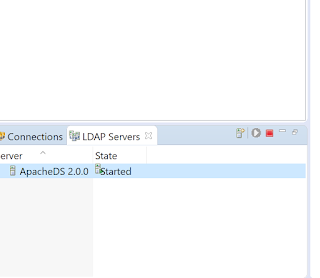
7) Once done you'll be able to see the LDAP Server in the Started State.


8) Now Click on LDAP on top and Click on New Connection. 
9) Add the below details in the new connection:
                     a) Connection Name : ldap
                     b) Host Name : localhost
                     c) Port : 10389

10) Click on Check Network Parameter and you'll get a successful message and click on Next.
11) Add the below properties in the Authentication tab.

Authentication Method : Simple Authentication
Bind DN or user : uid=admin,ou=system
Bind Password : secret (default password)

12) Click on Check Authentication and you'll get a successful message. And then click Finish.
13) Once you click on Finish , you'll get the below structure created:


                          Adding Users and Groups

1) Right Click on dc=example and dc=com and click on New -> New Entry.
2) In the New Entry wizard , click on Create Entry from Scratch and click on Next.


3) Search the organizationalUnit from the Available Object Classes and click on Add. Click on Next


4) On the RDN field enter ou. Enter the value as 'Groups'.


5) Repeat steps 1-4 for the users. In the RDN field enter ou and value as users.
6) Right click on ou=users and Click on New-> New Entry.
7) Click on Create entry from scratch and click on Next.
8) Search the inetOrgPerson from the availbale Object Classes and click on Add.
9) In the RDN field enter cn and value = varun


10) Click on next and Under the sn attribute, enter ‘sharma’ (sn stands for Surname).
11) We need to add two more attributes to this user.
12) Right Click on Attribute field enter uid. In this attribute enter the value as varun.
13) Similarly add the attribute as userPassword and click on next.
14) You will be asked to enter a password. Enter admin as the new password. Make sure that the Select Hash Method is set to SHA. (For this article we will keep the users in the admin group)


15) Now we will add the users to the group. Right click on ou=Groups and click New -> New Entry and click Click Entry from Scratch and Click on Next.
16) Search groupOfNames from the Object classes and click on Add.
17) In the RDN field enter cu and enter the value as admin.
18) Now it will ask you to pick up the member field browser to the user varun we created.
19) Click on Finish. 


AEM Configuration for LDAP

After the release of AEM 6.0 there are three configurations that needs to be done rather than the jaas.conf file which was there in the earlier releases.

1) Apache Jackrabbit Oak LDAP Identity Provider : It defines how users are retrieved from the LDAP server 

 Go to http://localhost:4502/system/console/configMgr and search for the above configuration and click on + icon to add new config. Configure the below properties:

                      a) LDAP Provider Name -- Name of provider of ldap. Enter value as ldap.
                      b) LDAP Server Hostname -- Host Name of Provider. Enter value as hostname.
                      c) LDAP Server Port   --- Port of LDAP Server. Enter value as 10389.
                      d) Bind DN    --- DN that is used of bind. Enter value as uid=admin,ou=system
                      e) Bind Pwd       -- Corresponding DN password . Enter value as secret.
                      f) User base DN ---Base DN for user searches, Enter value as dc=example,dc=com
                      g) User Id attribute--- name of user attribute. Enter value as uid  

Note :- UID attribute should be unique value when creating users in the LDAP servers.


2) Apache Jackrabbit Oak Default Sync Handler-

The synchronization handler will define how the Indentity Provider users and groups will be synchronized with the repository.

Go to http://localhost:4502/system/console/configMgr and search for the above configuration and click on + icon to add new config. Configure the below properties:
 
                         a) Synch Handler Name : default
                         b) User property mapping: profile/nt:primaryType="nt:unstructured" and                                                                                        profile/givenName=cn
                         c) User Auto Membership : administrators


3) Apache Jackrabbit Oak External Login Module-

This module is used for binding the two modules.

Go to http://localhost:4502/system/console/configMgr and search for the above configuration and click on + icon to add new config. Configure the below properties:

                        a) Identity Provider Name : ldap
                        b) Synch Handler : default

Now we have configured all the users we still need to synchronize it to get the users in the AEM.

Synchronize Apache DS Users


1) Go to jmx console (http://localhost:4502/system/console/jmx). Search for External Identity     Synchronization Management and click on the row.
2) Click on syncAllExternalUsers() to sync all the users manually.
3) Click the Invoke button. 


Go to the users tab. http://localhost:4502/useradmin. You will be able see the user we added (varun) in the user. Since we have given the group membership as administrators it should already be a part of the admin group. Login with varun user now with username as varun and password as admin (defined in the Apache DS Sever).


Debugging LDAP

Add the below loggers in the logger configuration with log level as debug.

1)  logs/ldap.logorg.apache.jackrabbit.oak.security.authentication.ldap
2) logs/external.logorg.apache.jackrabbit.oak.spi.security.authentication.external 


Wednesday, March 13, 2019

ACS Commons Tools - Part 1

In this blog I am going to discuss some of the tools that ACS Commons provide which are helpful in the course of development as well as provide easy to use functionalities.

1) AEM Environment Indicator

During the course of deployment to any environment we usually open multiple environments on the browser and make changes to different environments. Since there is less turn around time for fixing during deployment , it usually results in humane error.

Example : If we are deploying to preprod environment we usually have stage and local environment open in the browser and might copy values from stage to preprod by mistake.


ACS Commons provide an utility through which we can mark different environment with their name. This will reduce the confusion of on which environment we are working.

In order to enable it , go to /system/console/configMgr and search AEM Environment Indicator.


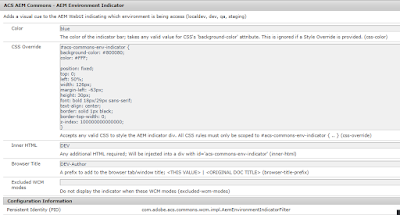
Enter the below values in order to enable the Indicator for the environment.


Properties :

1) Color : Marks the color of the indicator.Takes any valid css bg color value.
2) CSS Override : Css to style the indicator div. All css should be applied to #acs-commons-env-indicator.
Note :- z index value should have a higher value.
3) Inner HTML : Valid html or text for name of the indicator
4) Browser Title : Prefix for the browser title
5) Excluded WCM Modes : Mutli value property for excluding wcm modes.


After configuring properties, click on OK. You'll be able to see the indicator on your environment.


We can specify the name of different environments by putting the OSGI config com.adobe.acs.commons.wcm.impl.AemEnvironmentIndicatorFilter in the run modes.

2) ACS Named Image Transform Servlet

Acs commons provide image transformations via OSGI configuration through invoking a parameterized GET  request. This can be used to generate renditions of the image on run time , thereby putting less storage on the DAM.

In order to utilize it go to /system/console/configMgr and search  ACS AEM Commons-Named Image Transformer Factory


There are two properties that are required:

1) Transform Name : Name of the transform through which we want to apply the image transformations.

Example: We can define the name of the renditions and provide the image transform for it.

2) Image Transformers : Multivalue property where we can specify different tranformations that can be applied to the image.

Example: In the above example, I have used resize property with width and height.

To check the transformation of the image , open a particular image and add below to its source url.

.tranform/name-of-transform/image.png

Example : http://localhost:4502/content/dam/we-retail/en/activities/climbing/climber-gear-indoor.jpg.transform/380*460/image.png

This will result in an image with width as 380 and height as 460.

If we apply multiple transforms differently , the transformations will be applied in the same order. Example a resize and crop can yield result differently than crop and resize.


There are multiple other transformations that can be applied to the image. For further details :


Use the PID com.adobe.acs.commons.images.impl.NamedImageTransformerImpl for different run modes.  

If you want to check what all resource types are supported or modify the existing. Search NamedImageTransformServlet in /system/console/configMgr


Use the PID com.adobe.acs.commons.images.impl.NamedTransformImageServlet for different run modes.

Monday, February 25, 2019

All About GCC Compiler

Recently in one of my project, I faced an issue where angular code was coming on the screen instead of the resolved values.

Example : {{value}}


From AEM 6.2 , a new minification engine GCC (Google Clojure Compiler) has been introduced that we can swipe with the current YUI engine.

In order to configure it , go the OSGI configuration HTML Library Manager or Adobe Granite HTML Library Manager (AEM 6.4) and update the compiler value to gcc instead of the default yui.


In order to make it project specific , you can use the OSGI configuration with PID com.adobe.granite.ui.clientlibs.impl.HtmlLibraryManagerImpl in the run modes and update the below values to enable gcc compiler :

1) htmllibmanager.processor.css=["min:gcc"]
2) htmllibmanager.processor.js=["min:gcc"]


The other way to get the same thing working is to specify the multivalue properties in your cq:ClientLibraryFolder as cssProcessor and jsProcessor as below :

jsProcessor: ["default:none", "min:gcc;compilationLevel=advanced"]

Note: This will only be limited to the particular client library.

A custom processor can also be created by implementing the interface com.adobe.granite.ui.clientlibs.script.ScriptProcessor and the same properties can be specified in the cq:ClientLibraryFolder as properties.

Additional GCC options:


a) failOnWarning (defaults to false)
b) languageIn (defaults to "ECMASCRIPT5")
c) languageOut (defaults to "ECMASCRIPT5")
d) compilationLevel (defaults to "simple") (values : whitespace,simple,advanced)
                  1) whitespace : removes comments,line breaks and unnecessary spaces
                  2) simple : performs the same as whitespace plus performs optimizations within         expressions and functions including renaming of local varibales.
                  3) advance: performs the same as simple plus provide additional global transformations.


For more information on the compiler check the below link:

https://developers.google.com/closure/compiler/